Permaculture Paradise, the road so far…
- Posted in:
- permaculture
- gardening
- planning
In my first post I mentioned that I would sometimes stray away from technical subjects, and instead focus on the adventure of creating a magical, food producing forest on my land. I haven’t blogged about it yet, because to be honest, I couldn’t figure out how to generate a nice time-lapse from the weekly photos that I’ve been taking for the past year or so. That particular journey (putting together a time-lapse) will be a blog post all by itself, and involved shaving many yaks. I’m still not particularly happy with the time-lapse that you will see later in this post, but at least its a start. Alas, sometimes pragmatism has to win over perfection if you just want to get something done.
This blog post will provide some background for future gardening posts, and acts as an introduction into the “compost” part of this blog.
The Dream
My dream is to have a thriving garden, almost every part of which produces something edible. Nut trees, fruit trees, vegetables, bushes, chickens, worms, everything you can think of. I don’t want to have to rely on the constant application of commercial fertilizers and pesticides, I’d like it all to be organic. Ideally, I’d also like it to be a mostly closed system, where I don’t even have to introduce materials from the outside in order to sustain it. I’d also like it to be pretty to look at (I like green things) and to maybe provide a bit of privacy for the house (the back yard is a little open, we’re on a hill).
Trying to find a way to accomplish the above dream led me to the concept of permaculture.
Permaculture is a branch of ecological design, ecological engineering, environmental design, construction and integrated water resources management that develops sustainable architecture, regenerative and self-maintained habitat and agricultural systems modelled from natural ecosystems.
Source: Wikipedia
The definition sounded like it fit, so yay! Its nice to have a name for something. It helps when talking about it (and searching for it).
As far as I can see, it comes down to realizing that the garden will be a complex system. consisting of many disparate parts that must interact along specific channels. Kind of like any software project…
The Location
I’ve got a fairly normal sized block of land in Forest Lake, QLD. Its a little over 600m2, and the house takes up a large chunk of it.
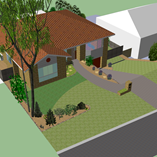
To assist with visualisation, my awesome fiancé used SketchUp to create a model of our house and the surrounding land. Here are some screenshots of the model:
Honestly, she’s pretty amazing when it comes to this sort of thing. She went and measured up the entirely of the house and land and then spent a few (wo)man days of effort modelling it all. We’ve used the model to discuss things, model new ideas and communicate them to builders and landscapers. Very very useful.
When we moved in in late 2010 the gardens were not that bad, but not that good either. We were mostly attracted to the house itself to be honest. It was the only place that my fiancé and I both walked into and said “This place feels right.”. If you are looking for a house to buy, that’s pretty much the best sign ever by the way. You should buy that house.
There were at least some garden beds around the perimeter, and the plants were doing okay. The lawn was mostly weeds, some Couch grass and that really annoying Crows Foot grass. The back and side yards were fairly heavily compacted as the previous owner had sold caravans (and was constantly moving them around). The soil consisted of mostly clay, rock and pain, was hydrophobic as well (not a lot of organic matter to help retain water). Rainstorms were particularly annoying, because the water would just run right off and into the lowest corner of the back yard, which made that corner squelchy and gross.
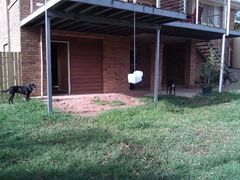
The model above actually includes some changes we’ve made since we moved in. There was a tank under the rear patio and no concrete slab down there (just dirt), and there was 2 shrubs near the western side of the fence in the back yard. About two years after we moved in we had underneath the patio sealed and the existing lawn torn up and turfed (with Sir Walter Buffalo).
You can see the way it used to look in this picture (with bonus dogs!).
The concreting and lawn work made the back yard quite nice, but maintaining the lawn is an ongoing process. I’ll probably go over that in a future post.
Its not perfect, but its enough, and I think I can make it something awesome.
The Plan
I’ve got a lot of ideas. Some of them are insane and some are feasible, and for a while there, I couldn’t easily differentiate between the two. There was a time I considered turning an old water tank we had into a tank for aquaponics! I didn’t even have a normal vegetable bed yet! That would probably have been an expensive lesson in failure (or maybe an awesome lesson in how to be awesome, I’ll never know).
Luckily cooler heads prevailed (i.e. not mine, credit goes to the awesome fiancé again) and I started with smaller things, like compost, and vegetable beds.
The Professionals
While I love solving problems (its what I do!) its never a bad idea to involve a professional when you’re looking to do any sort of long term project like this. This is where I engaged the help of All You Can Eat Gardens, a local Brisbane business that helps people do exactly what I’ve been talking about. I got them to do a concept for the whole yard, taking into account my own ideas and applying their own professional experience. It turned out pretty good, and I found them to be very communicative throughout the entire process (although they get quite busy, so I had a fairly long wait before they could get to me).
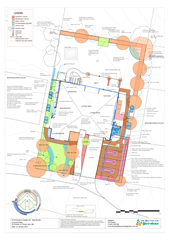
This was their concept:
It pleases me greatly on some sort of engineer/graphic design level. I’m not entirely sure why. The concept also came with a document detailing a lot of things in the concept diagram, resources to follow and other useful tidbits. I think it was a worthwhile investment.
At some stage I’ll go back to them and get them to do a detailed design (in which they help you plan out in detail exactly what goes where and how to do it) but for now I’ll just follow through on the general stuff in the concept and keep learning at my own pace.
The Progress
So far (and with the help of my fiancé), I have:
- 2 established vegetable beds, made with leftover bricks, both with a drip irrigation system.
- 1 recently built timber bed, which won’t be ready (i.e. full of soil) until next season. Building this bed was a great learning experience, and I’ll do a blog post about it at some point in the future.
- 2 compost bins, which are awesome.
- A mulch pit, which has helped me to improve various areas (yay organic matter!).
- A thriving herb garden in a previously barren area under the patio.
Here’s a time-lapse (one photo/week, over 47 weeks) of the eastern side of the house. This is the location of the vegetable beds, the compost bins, the (short lived) worm farm, the mulch pit and a few other things.
That particular time-lapse is hosted on gfycat, and is available at http://gfycat.com/EnchantedDearestIrukandjijellyfish if you want to look at it directly. If you’re running a modern browser you should be able to pause, speed-up, slow-down, reverse and all other kinds of nifty things. If you’re running an old browser, sorry, its a fairly massive animated gif for you (get a better browser!).
I have photos that I can use to make similar time-lapses of other areas of the yard, but they take forever to stitch together into animated gifs that don’t look terrible, so they might come in future posts.
The eastern side is really a test area, where I can get a handle on things before I involve any more of the yard. It probably won’t be the permanent location of the vegetable beds at least (not enough sun), but its a great, isolated place to learn. The compost bins have been effective, I use them to dispose of all of the vegetable scraps from the kitchen. The compost I’ve harvested from them has been rich and black, and I’ve used it to enrich the perimeter beds and to improve the soil on the very barren western side of the house.
Not too bad.
The next steps are to continue building out vegetable beds (1 more, then replace the two brick ones with wood as well) until I have all 4 needed for crop rotation, and to keep building up the soil.
More to come!


